Custom States are a cornerstone of Bubble app development. In short, they are simply a way to temporarily store information of some kind. If you come from a programming background, they can be compared to a variable that can hold anything from strings and integers to objects.
There’s a more or less limitless number of possible scenarios where Custom States can come in handy, so instead of looking at specific examples, let’s look at what they are and what they’re not. We’ll also have a look at the alternatives you have to choose from in cases where a Custom State is not the right option.
Let’s dig in.
What is a Custom State?
A Custom State is a kind of variable that you can save on any Element on your page. It can hold any type of information that you want, like text, numbers, yes / no, dates and Data Types and can even hold a list (or array) of those things. You can change the value of a Custom State as many times as you want, but its type is static.
Custom States only stores data temporarily. Anything that you save in it is lost as soon as the User navigates away from the page or closes the browser tab, so its meant as a way for your app to “remember” stuff only while the page is in use. Since you don’t need to communicate with the database on Bubble’s server, you’ll find that Custom States are really fast – so fast in fact that you won’t notice any processing time at all in most cases.
How do I create Custom States?
As mentioned, Custom States are connected to Elements. Now, elements can be anything on the page you are currently working on, including the page itself and each of them can hold as many Custom States as you need. There are several ways to set up a new Custom State, but let’s first look at the one that gives you the highest degree of control over the State you’re setting up.

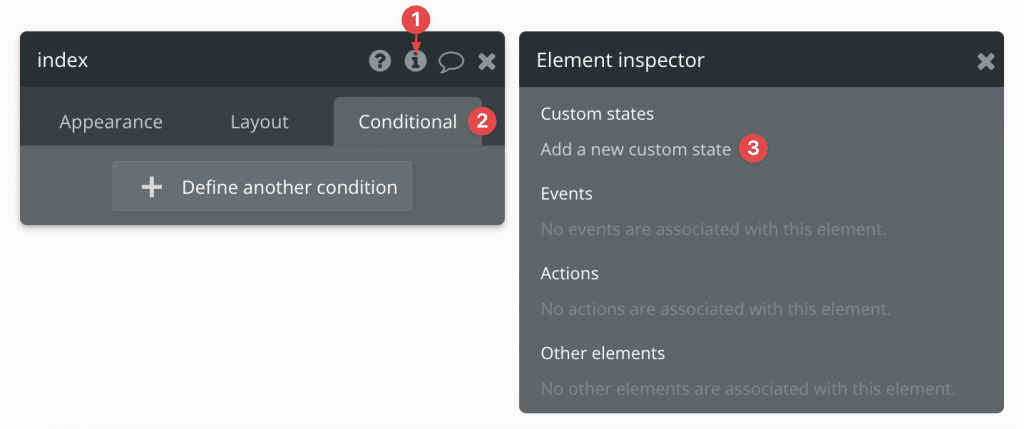
By clicking the info icon in the top right corner of the Element Property window, you’ll see the Element Inspector. Here you can see all Custom States that you’ve already set up, change their Data Type, convert them to a List or provide a default value.
How do I change the value of a Custom State?
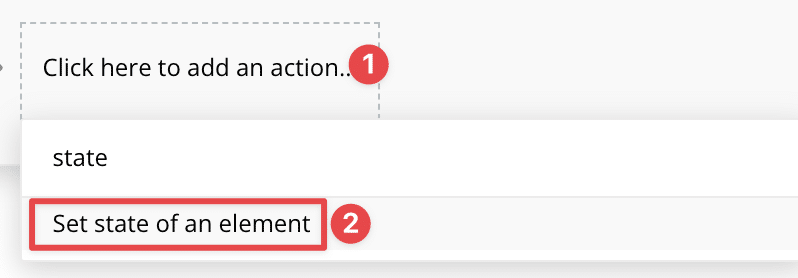
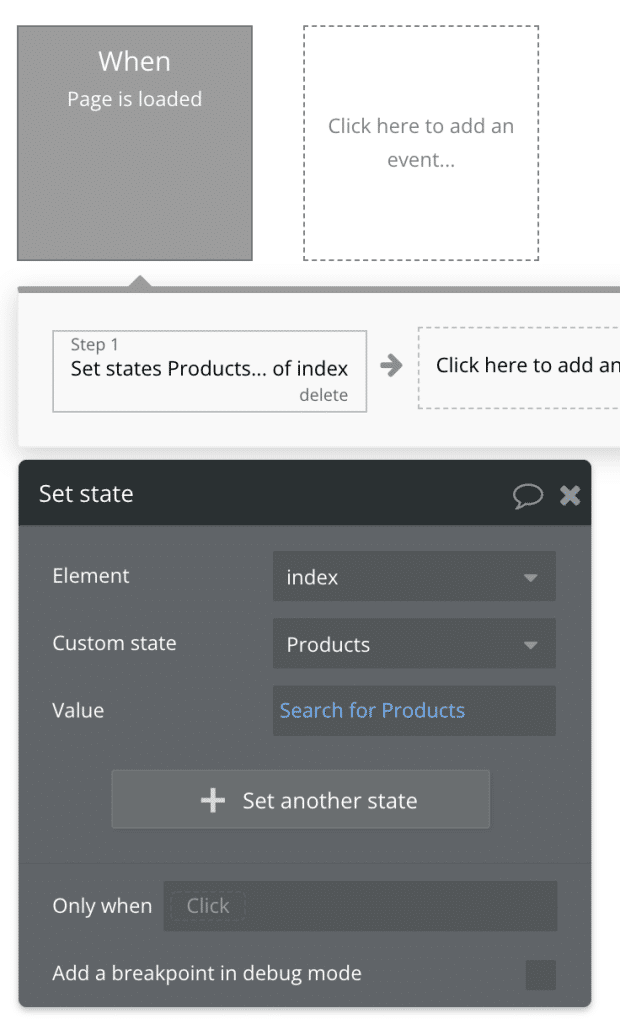
When a Custom State is set up with a Data Type, you can manipulate it using the Set state action.

Any value that you provide in this action will overwrite the old one, including if you provide an empty value.
Custom State values are static in the way that they do not change unless you specifically tells Bubble to update them. For example, if you set a State’s type to date and then set its value to the Current date/time, then its value will reflect the exact time when it was set – it will not continually update to reflect the actual updated time.
Any database content stored within the state is kept up to date as data changes on the other hand. To illustrate, let’s assume that I’ve set up a state named UserState with the Data Type User. I then populate that state with the Current User (using the set state action). If I proceed to change the email of the user, and then reference the Data Type in that state (using the structure UserState’s User’s email), the correct email shows up.
This is because the state doesn’t actually contain any User data – it simply stores the Unique ID of the User and then fetches the data from the database.
Setting default values
When you set a default value on a Custom State, the state till be prepopulated with that value when the page loads. It’s worth noting a few points on how that logic works.
- Just like an empty value, the state will be reset every time the page loads
- Not all Data Types support default values. The following data types do support it:
- Text
- Number
- Date
- Yes / No
- File (let’s you upload a file, but not set a custom URL)
- Image (same as above)
- When you reset a Custom State by using the Set state action with an empty value, the state will be reset to its default value, and not be empty as you might expect. To get around this (and actually clear the content of the State), you can place a space as its value. Bubble will place apostrophes around that space. If you then remove the space again, the apostrophes remain with an empty value.
Using lists
States can also contain a list of Things. Let’s say we have a state of Type text for example: a list of texts would simply mean an array of separate text values:
text1, text2, text3
that can then be filtered and sorted just like any other list.
When working with lists in states, there are a few points that are worth noting to avoid bugs or surprises: first, I’ll repeat the point that Custom State values are static: if you add a list of Things to a custom state as the result of Do a search for, and then new items are added to the database afterwards, the list will not update until you specifically tell it to by setting its value again.
Secondly, and this can be somewhat confusing, if an item is removed from the list, the item count in the custom state will remain the same, even if the database record is unavailable. To explain this a bit further, let’s first look at how Bubble actually saves a list of Things. Remember what we said earlier, that a state doesn’t actually contain the Data Types you assign to it – it only contains a reference to those Things in the database: their Unique ID’s. If save a single database Thing in a custom state, that state simply contains 32 characters, looking something like this:
1639074201387x825375533794316000
Saving a list of Things is the same thing: simply a list of comma-separated Unique ID’s:
1639074201387x825375533794316000, 1639074201387x825375533794316001, 1639074201387x825375533794316002
Now let’s say that one record is removed from the database: the unique ID will automatically disappear from the list, but the list count remains the same. The Unique ID is gone, since it no longer exists in the database, but Bubble still doesn’t actually update the list until you tell it to: the count is still 3. If we removed the middle value in the example above, the actual result would be:
1639074201387x825375533794316000, , 1639074201387x825375533794316002
Notice the empty value in the middle. The count remains the same, and this is important to be aware of in cases where you show that count on the Page, use it in Conditions or to trigger a Workflow.
Typical use cases for Custom States
Navigation
Custom States are frequently used for navigating different sections of your app. By combining Custom State values with Conditions placed on Groups and other Elements, you can quickly hide and show content on your page based on the User’s actions. This method has also been pushed by Bubble’s official documentation, so especially new Users tend to use it. While there are scenarios where this approach makes sense, I don’t find it the best approach. We have a full article on why using URL parameters for navigation in Bubble is better in many cases, and you can also check out or general guide on URL parameters to learn more about how they work.
Pre-loading content
I’ve also seen many examples of developers using Custom States to pre-load a list that they later want to display on screen as a way to speed up their app. They’ll load the list into a Custom State upon page load (or some other time), and then reference that list in a Repeating Group when as the User navigates to it. The method will work perfectly fine, but I still caution against. The main reason for this is the repeated fact that Custom States are static, not dynamic – if a record is added to the database after the list is already loaded, it’s not going to update.

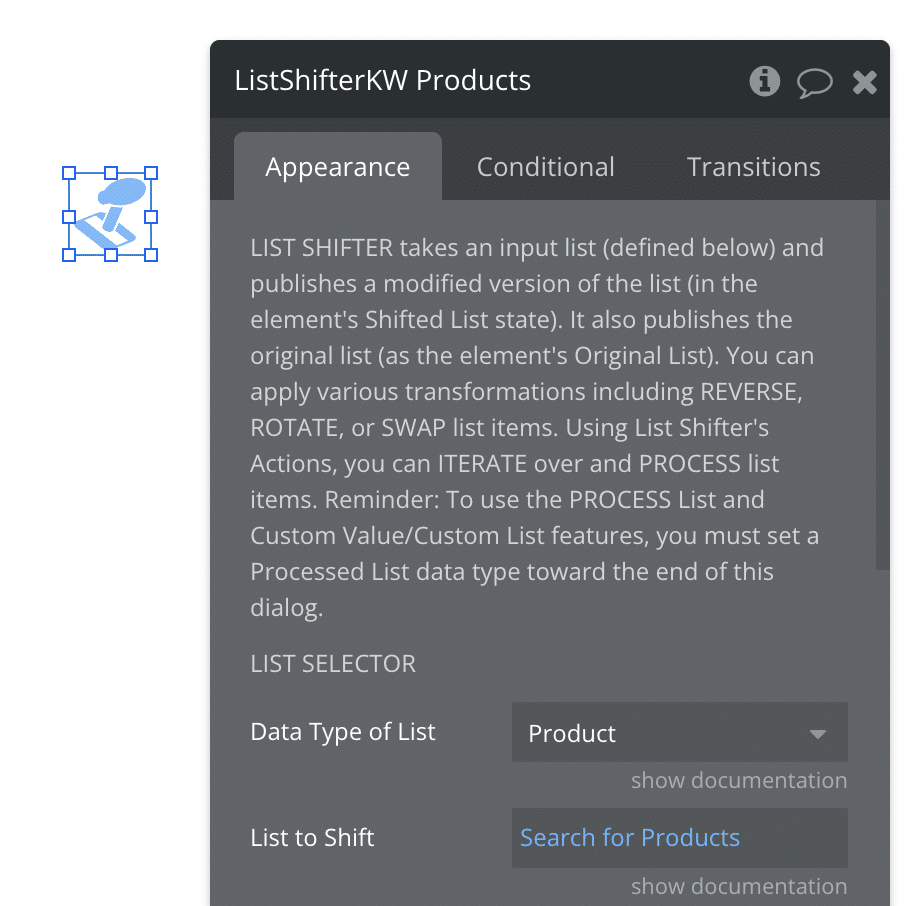
I prefer to use dynamic searches whenever I can to avoid having to rely on actions to update it. Because of this, I prefer to pre-load list into an element that is always up-to-date with the database. A hidden Repeating Group can do that job, but more lightweight is an element like the free List Shifter plugin. Place that element on the page and use Do a Search For to populate it with a search result – whenever anything is updated in the database, the list will instantly synchronize.

Are Custom States secure?
The short answer is no. Anything that you load into a Custom State is downloaded to your browser and stored as plaintext, which means that a hacker can easily find the information just using Chrome DevTools or similar tools. In other words: never store any kind of sensitive information in Custom States. What’s important about this point is that getting access to the data doesn’t really require much of a hacker at all – it’s fairly easy to find and can be done in less than a minute. Our full guide on Bubble Privacy Rules gives you a quick look at how easy it is to reveal sensitive information using only the browser.
If you have questions or comments, let us know in the comments!


5 Comments
You are creating content that is valuable, but you’re missing two very basic ways that people can show that it’s valuable (and you know Bubble, so you should be able to implement very easily).
1. Have a counter on the page showing how many people have visited the page.
2. Have a little heart icon that people can click to show that they liked the content.
The barrier to action for these items is a lot less than “leaving a comment” or “buy me a coffee”. In fact, if other people see more interaction with the page, they are then more likely to to leave a comment or buy a coffee.
Also, you could implement “auto-moderation” allowing for the comment to be posted to the page immediately. This gives visitors a sense of satisfaction when they see their comment.
It’s the small things that count – that give a visitor a feeling of “completion” when they visit. You see, because my comments are posted immediately, there is a very little bit of attention that gets stuck on that for me (and most people) when I leave the page and that feeling creates a small sense of dissatisfaction.
The auto-mod could weed out unsatisfactory comments by a filtering system using a list of words, such as curse words, and things like “don’t like”, “hate”, “wasn’t very”, “not good”, etc.
Just a thought.
Thanks for taking the time to write this great feedback Ryan. Will certainly take that into consideration.
The lateness of my response I supposed illustrates your point better than any words of mine could do 😳